I connected Codex, running GPT-6 Astra, to a physical PC through NanoKVM. Together we sorted out mixed RAM, put back a stick I had written off as dead, and tried faster settings. All 32 GB booted at 3200 MT/s; the final stability test was still running when the session ended.
The machine and the connection
My PC kept stopping in POST safe mode with mixed Corsair and Kingston RAM. I wanted it to boot reliably and run the memory at a sensible speed. A NanoKVM was already connected to the machine and exposed to Codex through MCP, so I asked Codex to investigate.
I was curious how far Codex could get with the same screen and keyboard access I used to navigate the BIOS.
“We have a NanoKVM MCP attached so you can see the screen and pass keyboard inputs.”
My opening instruction.
I used Codex with GPT-6 Astra. I set the goal and answered its hardware questions, then moved the sticks when needed. Codex read screenshots and worked through the BIOS menus, changing settings and checking what happened after each reboot. The images here include screenshots from that conversation and my photographs of the hardware.
The NanoKVM used for the session: the hardware connection between Codex and the target computer.
NanoKVM has a built-in MCP service. The tool schemas Codex saw match Sipeed's implementation. We used three tools:
| Tool | What it supplied to the session |
|---|---|
cube_screenshot | A JPEG of the target display, with capture status and dimensions. |
cube_press_keys | A key or simultaneous key combination, held briefly and then released. |
cube_type_text | Text entered character by character through keyboard emulation. |
The connection name appears in calls such as mcp__home_server_kvm__cube_press_keys. The NanoKVM tool itself is cube_press_keys.
Sipeed documents how to enable MCP and connect an AI tool using the endpoint and API key. Its configuration example uses OpenCode; this session used Codex.
NanoKVM maps key names to USB HID keyboard reports. Its input executor sends a key-down report and then releases the keys. Text entry is a sequence of these reports, which lets Codex type numeric values into firmware without an operating-system clipboard.
Codex could capture the screen, send input, and inspect the result before the operating system loaded. NanoKVM had no command to set a memory frequency. Codex had to find the setting on screen and reach it through the keyboard.
Finding the fourth stick
Codex started by identifying the hardware in the firmware screens: an ASUS ROG STRIX X470-F GAMING running BIOS 6232, a Ryzen 7 2700X, and 8 GB modules from Corsair and Kingston. The Corsair part number was CMK16GX4M2Z3200C16; the Kingston modules reported KHX3200C16D4/8GX.
Both kits had a 3200 profile with 16-18-18-36 primary timings at 1.35 V. The machine was running below that speed. A stored profile told us what to try; we still had to find out whether the system would start with it.
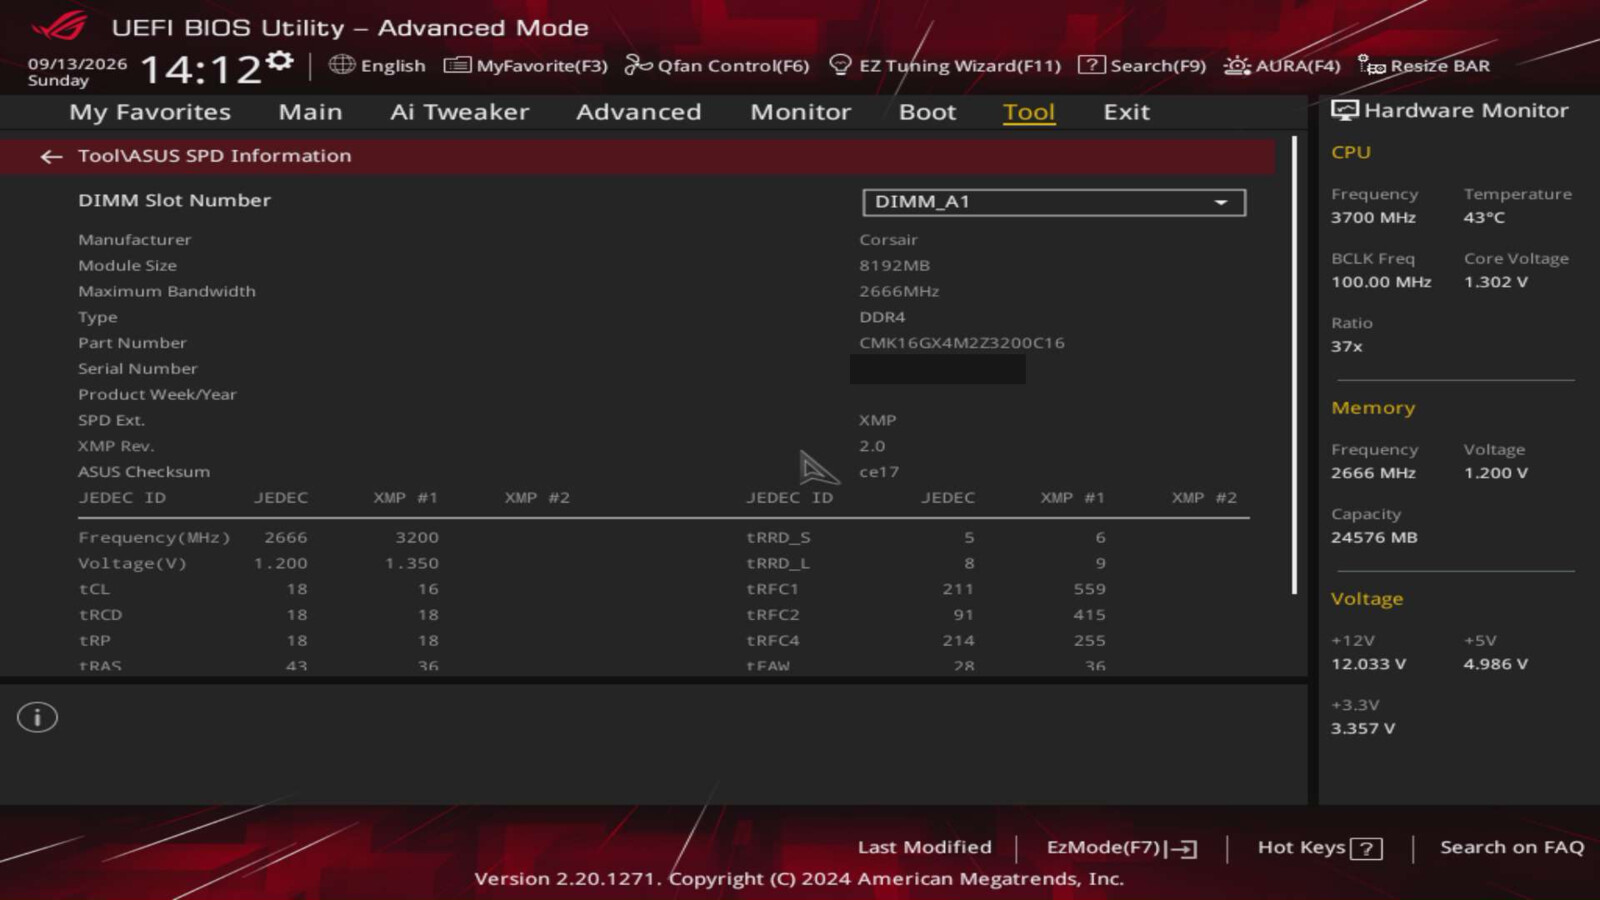
An empty slot made Codex suspect an undetected module. I explained that only three sticks were installed. We rearranged the Kingston pair into A2/B2, then checked the slots in BIOS.
The three installed modules, with A1 empty. This photograph is what Codex read; the slot check happened in firmware.
Codex misread one of my photographs and placed the Corsair in A1. The firmware showed it in B1, with A1 empty, and Codex corrected itself. That check also told us which slot was free.
“BIOS shows Corsair in B1 and A1 empty, so my photo-based slot mapping was incorrect; the matched pair is still where we want it.”
Codex correcting its slot identification.
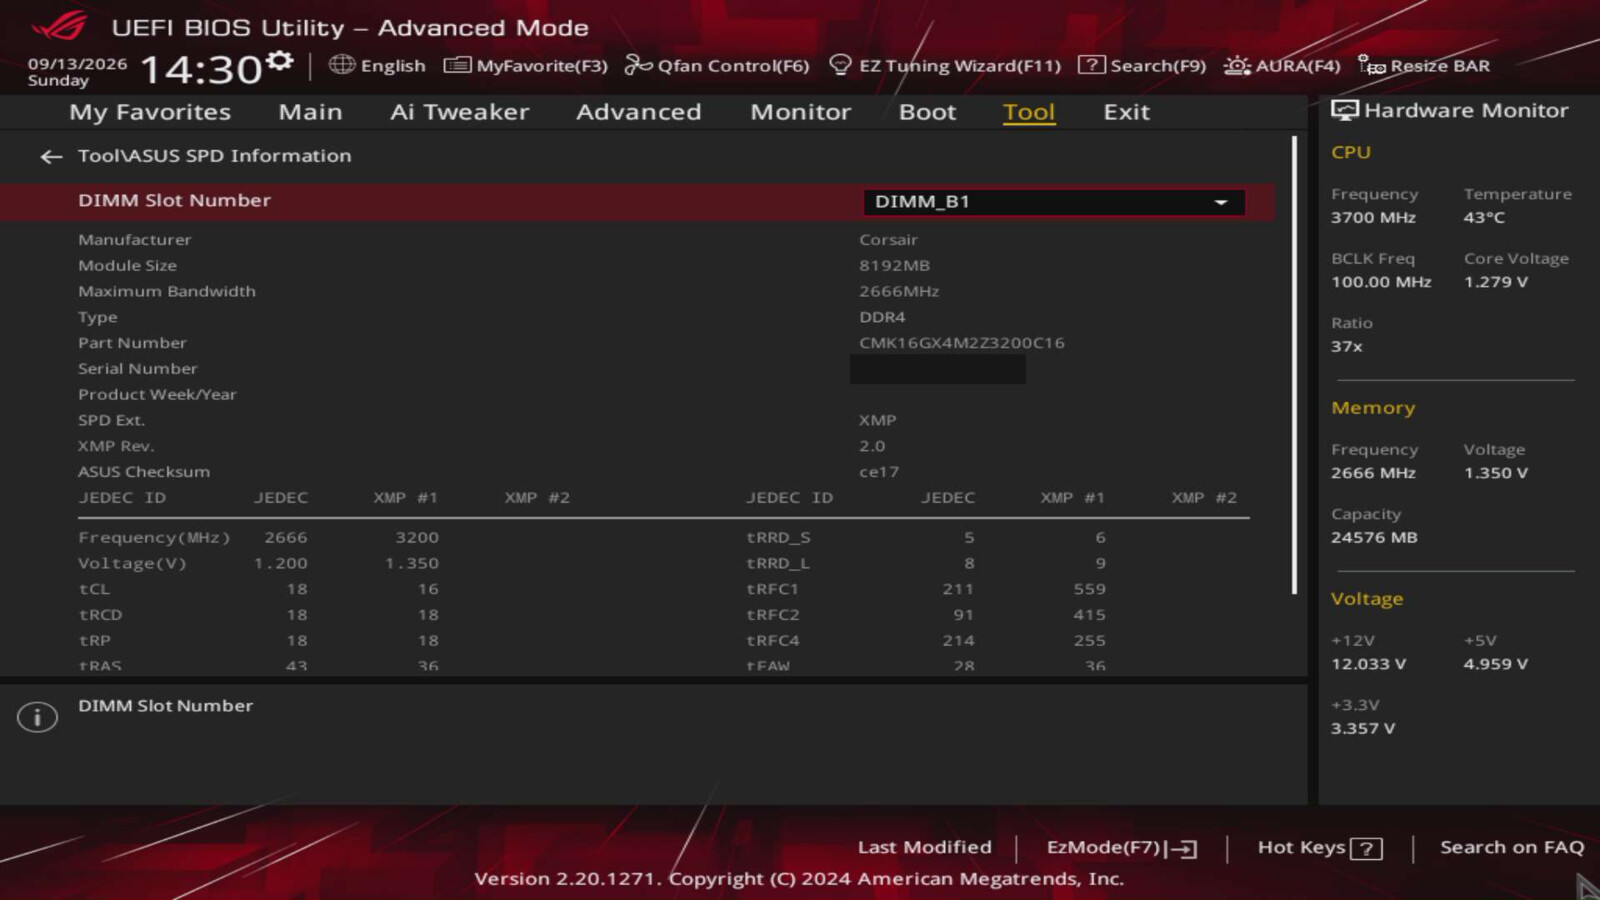
“I have the other Corsair stick lying around because I assumed it got bad…”
My message before reinstalling the spare.
I powered down and installed the spare. The machine booted with 32 GB, and Windows showed all four slots populated.
“It booted! Please run the memory test again”
My reply after installing the spare.
After I reinstalled the spare module, Windows detected all 32 GB.
Testing across reboots
I offered to sign into Windows so it could use Windows Memory Diagnostic. Everything we needed was already on the machine.
The same NanoKVM connection worked throughout. Codex opened Windows Memory Diagnostic from Start, checked the restart dialog, and activated the selected option. After the reboot, it captured the diagnostic screen.
We launched the diagnostic three times: with 24 GB at 2666 MT/s, with 32 GB at 2666 after I installed the spare, and finally with 32 GB at 3200. I interrupted the first run to install the stick and reported success after the second.
Codex used this keyboard sequence:
Ctrl+Esc → open Start
Type "Windows Memory Diagnostic"
Enter → open the utility
Capture the screen → inspect the selected restart option
Enter → activate "Restart now and check for problems"
Wait through reboot
Capture the screen → confirm the preboot test is running
The screenshots below follow the second launch, with all 32 GB detected at the 2666 baseline.
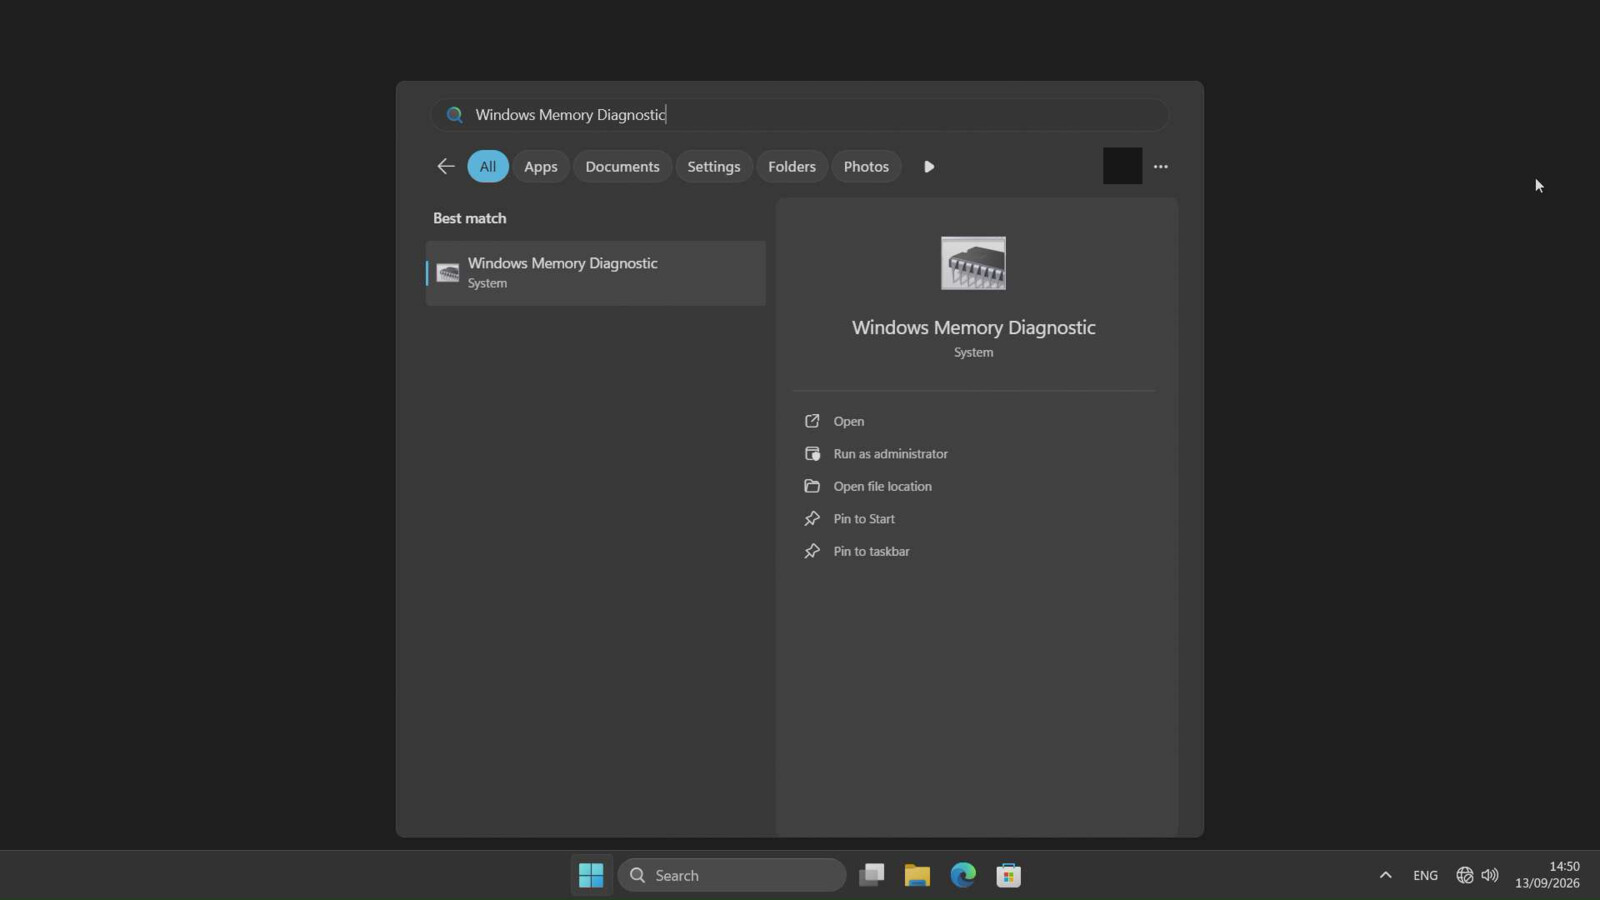
The first attempt to launch the diagnostic hit an input-ownership problem: Ctrl+Esc and text entry were rejected with manual control is active. Later retries worked. Slower keystrokes alone cannot explain that recovery; the control path also had to become available.
Trying faster settings
I asked Codex to try faster settings, including 3600. It started at the modules' rated 3200 profile, with the rated timings and voltage. All 32 GB passed POST.
“Let's try several combinations until one of them gets us the 3600mhz”
My request to keep experimenting.
We tried four configurations at 3600 and three at 3400. All seven failed memory training. Codex varied the primary timings, command rate, Gear Down Mode, and SoC voltage. The board recovered into safe mode after failures, sometimes falling back to 2400.
“All four 3600 configurations tried so far have failed POST, including loose timings, Gear Down Mode, and 2T with 1.10 V SoC.”
Codex reporting the failed 3600 trials.
Between the 3600 and 3400 trials, I asked Codex to look for other people's results with the same modules. Before it started searching, it noted what was still pending in BIOS:
“The BIOS is still on the frequency menu; the 3200 restoration has not been saved yet.”
It had said it would restore 3200, but had not saved the change.
One promising report needed a closer read:
“The closest Kingston report initially claimed 3800, then reported poor performance; I’m checking its final result before treating it as a success.”
The reports involved different CPUs, matched kits, or module revisions. Codex found no verified success with my exact four-stick configuration.
Codex asked for the Corsair revision printed on the modules. I checked both sticks: version 4.31. I then asked it to try 3400.
How the keyboard sequences evolved
The tool defaults were a 50 ms key hold and 30 ms between typed characters. By the end of the session, Codex was requesting 100 to 200 ms holds and 200 ms typing delays, with explicit waits between steps.
The excerpts below follow that change in order. I reformatted them for readability and ended the later excerpts before screenshot handling or further menu navigation; the keystrokes, values, and delays are unchanged. They come from different starting screens, so this is a chronological comparison, not a controlled test. The effective sequences are my expansion of what the code requested, not USB captures.
A keys array sends a simultaneous combination: ControlLeft, AltLeft, and Delete together mean Ctrl+Alt+Delete. Separate arrow presses need separate calls, hence the loops.
Finding a route through the menus
An early call moved down three entries and pressed Enter:
for (let i = 0; i < 3; i++)
  await tools.mcp__home_server_kvm__cube_press_keys({ keys: ["ArrowDown"] });
await tools.mcp__home_server_kvm__cube_press_keys({ keys: ["Enter"] });
Effective key sequence:
Down → Down → Down → Enter
Arrows show order, and explicit waits are listed separately from key holds. With no hold duration specified, these presses use the schema's 50 ms default, and there are no waits between them.
A later recovery sequence entered setup with F1, waited, moved right, then stepped down eleven entries with pauses before pressing Enter. The original call requested a screenshot next:
await tools.mcp__home_server_kvm__cube_press_keys({ keys: ["F1"], holdMs: 100 });
await new Promise((r) => setTimeout(r, 1800));
await tools.mcp__home_server_kvm__cube_press_keys({
  keys: ["ArrowRight"],
  holdMs: 100,
});
await new Promise((r) => setTimeout(r, 700));
for (let i = 0; i < 11; i++) {
  await tools.mcp__home_server_kvm__cube_press_keys({
    keys: ["ArrowDown"],
    holdMs: 100,
  });
  await new Promise((r) => setTimeout(r, 250));
}
await tools.mcp__home_server_kvm__cube_press_keys({ keys: ["Enter"], holdMs: 200 });
await new Promise((r) => setTimeout(r, 1500));
Effective key sequence:
F1 [hold 100 ms] → wait 1.8 s
Right [hold 100 ms] → wait 700 ms
(Down [hold 100 ms] → wait 250 ms) × 11
Enter [hold 200 ms] → wait 1.5 s
By then, Codex was following a route with time for the interface to respond at each step. It still needed to start from the expected screen; eleven Down presses would mean something else in another menu.
Getting back into firmware
An earlier call had requested a 1.5-second Delete hold:
await tools.mcp__home_server_kvm__cube_press_keys({
  keys: ["Delete"],
  holdMs: 1500,
});
Effective key sequence:
Requested: Delete [hold 1.5 s]
Actual: validation error; no key press executed
The tool rejected the request because holdMs exceeded its 1,000 ms maximum, also listed in the NanoKVM tool schema. No key press ran. Later, Codex pressed Enter to confirm a restart and sent fifteen short Delete presses, waiting 1.5 seconds before each. It then requested a screenshot to see where the machine had landed:
await tools.mcp__home_server_kvm__cube_press_keys({ keys: ["Enter"], holdMs: 100 });
for (let i = 0; i < 15; i++) {
  await new Promise((r) => setTimeout(r, 1500));
  await tools.mcp__home_server_kvm__cube_press_keys({
    keys: ["Delete"],
    holdMs: 100,
  });
}
Effective key sequence:
Enter [hold 100 ms]
(wait 1.5 s → Delete [hold 100 ms]) × 15
Each wait comes before its Delete press, including the first. The screenshot comes after the fifteenth press.
The earlier call failed at API validation. In the later routine, Codex used 100 ms holds and put the longer waits in the orchestration code. The progression is visible, although the record doesn't show whether GPT-6 Astra connected that choice to the earlier error.
Reusing the timing-entry loop
For a 3400 trial, Codex filled successive timing fields with this loop:
for (const v of ["18", "20", "20", "20", "40"]) {
  await tools.mcp__home_server_kvm__cube_press_keys({
    keys: ["ArrowDown"],
    holdMs: 100,
  });
  await new Promise((r) => setTimeout(r, 400));
  await tools.mcp__home_server_kvm__cube_type_text({ text: v, delayMs: 200 });
  await tools.mcp__home_server_kvm__cube_press_keys({
    keys: ["Enter"],
    holdMs: 100,
  });
  await new Promise((r) => setTimeout(r, 400));
}
Effective key sequence:
Down → type "18" → Enter
Down → type "20" → Enter
Down → type "20" → Enter
Down → type "20" → Enter
Down → type "40" → Enter
Each row is a 100 ms Down press, a 400 ms wait, the value typed with delayMs: 200, a 100 ms Enter press, and another 400 ms wait.
Inspect the five timing fields
The five fields populated by the loop, including separate read and write RCD controls. These are the entered settings before reboot; the hardware monitor still reports the current fallback speed of 2400.
To restore 3200, Codex ran the same loop with 16, 18, 18, 18, 36. Only the values changed; the field order and timings stayed the same, including the five separate entries this BIOS needs for split read and write RCD controls.
This is the pattern I could see in the conversation: Codex accumulated routes through the menus and reused input procedures on this machine. It still took screenshots and sometimes sent individual corrective keys between longer sequences; those checks showed whether a setting had changed or a reboot had worked.
I'd call this in-context adaptation. Earlier observations in the conversation guided later decisions, which is what the in-context learning paper describes: adapting without a training step. Reading labels and choosing actions from screenshots worked in this firmware interface too. OpenAI's computer-use documentation describes the same action-and-screenshot loop; NanoKVM provided the screen and input paths here.
What the conversation doesn't show is what GPT-6 Astra already knew. It may have known shortcuts such as F10 or Ctrl+Shift+Esc going in, and I can't tell whether this BIOS appeared in its training or whether it kept any lasting skill from the session. The longer routines alone don't prove that navigation got faster or more reliable. The screenshots do show Codex operating the firmware through general screen and keyboard tools.
Results and usage
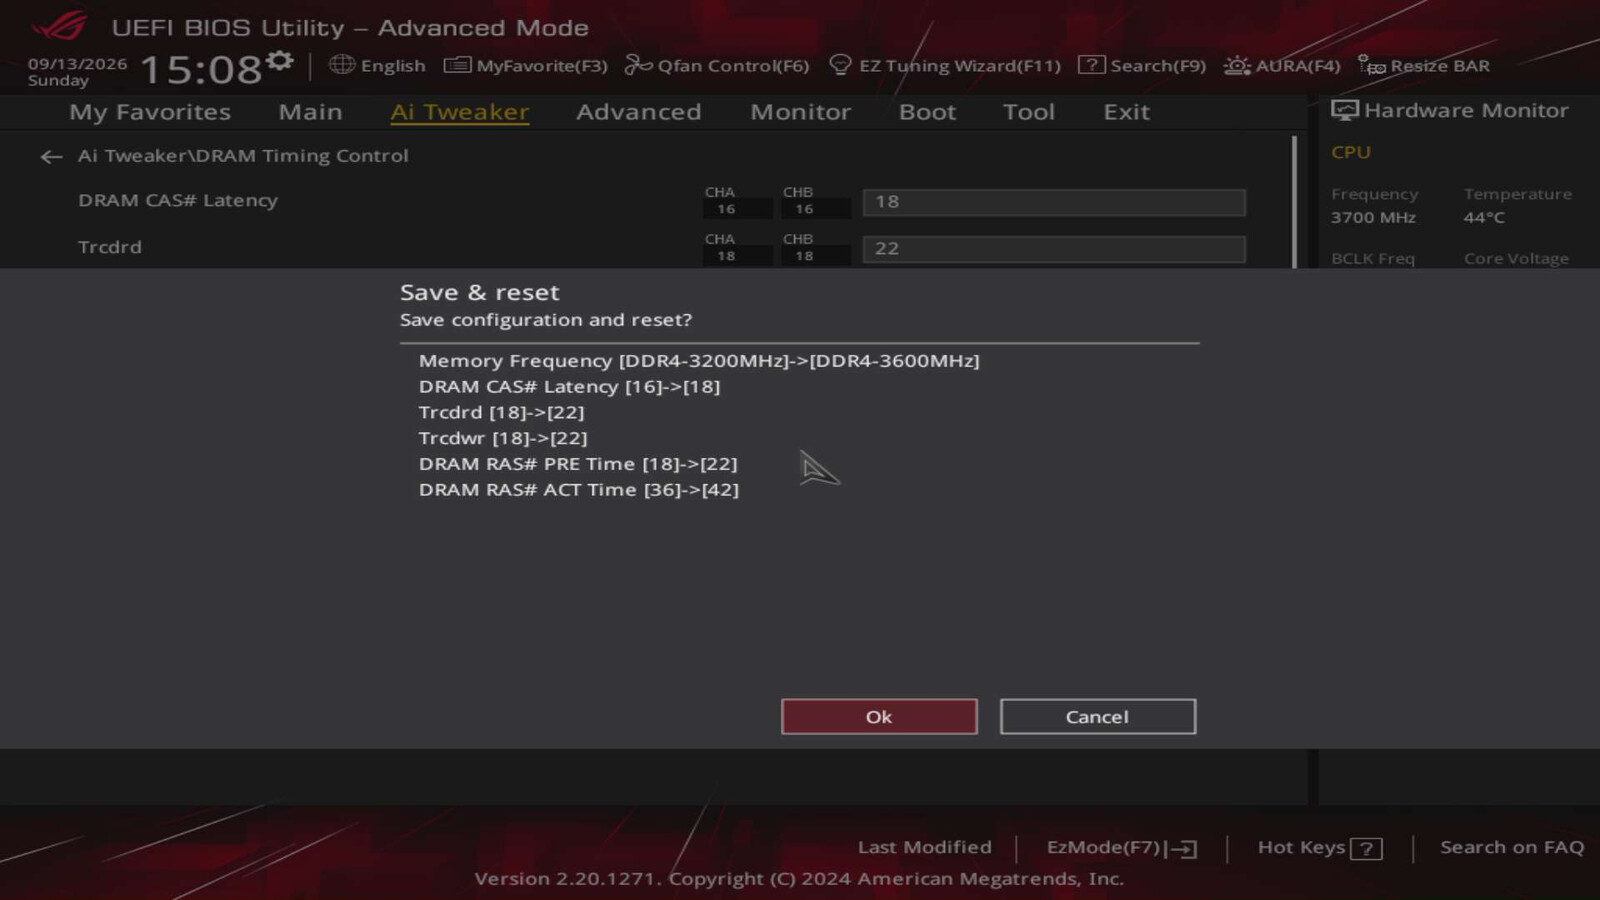
After the faster settings failed, Codex returned to the 3200 configuration that had booted earlier. The save dialog listed the rollback from 3400 to 3200, tighter primary timings, and Gear Down Mode back on Auto.
Inspect the rollback confirmation
The firmware's own change summary before saving the rollback.
BIOS then reported 32768 MB at 3200 and 1.350 V. Windows booted, and Codex started another two-pass memory diagnostic.
Verify the restored memory configuration
All four modules detected after the return to 3200 MT/s.
The session ends with the diagnostic at 1% of its first pass and no problems detected yet. We don't have a completed test at 3200:
“The two-pass memory test is now running. No errors so far; stability is not yet confirmed.”
The final recorded response.
Pass one of two at 1% when the session ended.
We went from three detected modules to four after I installed the spare, and I reported a passing baseline test at 2666. After seven failed attempts at higher speeds, Codex restored a 3200 configuration that booted. We hadn't established the fastest stable setting or measured an improvement in application performance.
Across the three saved transcripts, I counted 232 model responses totaling 29,935,286 tokens:
| Token category | Recorded tokens |
|---|---|
| Cached input | 28,941,824 |
| Uncached input | 969,703 |
| Output | 23,759 |
| Total | 29,935,286 |
About 96.8% of the input was cached. The total counts processing across responses, including repeated conversation context and image inputs. It isn't 30 million tokens of unique material, and it doesn't tell us the dollar cost.
There were also 901 NanoKVM MCP calls, counting each invocation inside a loop:
| MCP tool | Calls | Completed | Failed |
|---|---|---|---|
cube_press_keys | 751 | 628 | 123 |
cube_screenshot | 119 | 116 | 3 |
cube_type_text | 31 | 30 | 1 |
| Total | 901 | 774 | 127 |
A keyboard call can send a combination, while a typing call can enter a whole string, so 901 calls doesn't mean 901 keystrokes. A completed call only tells us the tool finished; we still needed screenshots and the machine's subsequent behavior to check the result.
The 127 failed calls include rejected arguments, unavailable input ownership, and three failed screenshots.
How I counted
Tokens: I summed the usage records after deduplicating them by response ID. The final thread counter reports 29,819,091 tokens. Another 116,195 tokens belong to an earlier continuation outside that final counter, which brings the all-files total to 29,935,286.
MCP calls: I counted the tool events and deduplicated them by call ID.
Who did what
I handled the sticks and supplied information the screen couldn't show. Codex did much of the repetitive navigation and checking, including the work before the operating system loaded. Through NanoKVM, we could use the same process of acting and checking in an older firmware interface that we used on the Windows desktop.